[Tutorial] How to Bypass MCMC/ SKMM Blockade
Frustrated because of your favorite site inaccessible because of the MCMC?
Well, you need not to worry anymore.
Yes, there is a way to bypass the blockade imposed by the MCMC.
Well, you need not to worry anymore.
Yes, there is a way to bypass the blockade imposed by the MCMC.
This can be done because the blockade is made based on DNS (Domain Name Server).
So to bypass the block, you only need to change the DNS from your ISP into another free DNS, preferably Google Public DNS.
So to bypass the block, you only need to change the DNS from your ISP into another free DNS, preferably Google Public DNS.
Now, how to do it? If you are an active downloader be it from file hosting or P2P, you probably already know where and how to tweak the DNS.
This tutorial is for those who doesn't know how exactly to change their DNS.
Click read more to see the tutorial.
First.. this is for Windows Vista/ 7 only.
This tutorial is for those who doesn't know how exactly to change their DNS.
Click read more to see the tutorial.
First.. this is for Windows Vista/ 7 only.
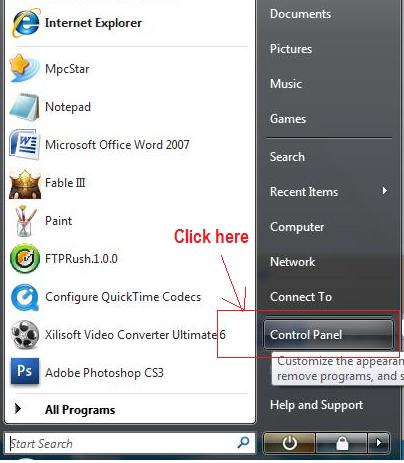
#1. Click Start, and go to Control Panel
#2. In the Control Panel, click on Network and Sharing Center

#3. In the Network and Sharing Center, click on Manage network connections.

#4. From the new windows, Right-hand Click on the Local Area Network for ethernet connection. But if you are using wireless connection, then click on Wireless Network Connection. If you are using USB based Modem, then it will be the name of your Modem, like Celcom 3G or Maxis.. Then click Properties from the menu.

#5. In the Properties windows, highlight Internet Protocol Version 4 (TCP/IPv4). Then click Properties.

#6. From the new properties windows, change the setting from 'Obtain DNS server address automatically' into 'Use the following DNS server addresses'.

#7. You can add any free DNS that is available out there. For Google Public DNS it is
Preferred DNS server: 8. 8. 8. 8
Alternate DNS server: 8. 8. 4. 4
#8. Click OK. You can go for the Advanced button, but its pretty much the same. What you want to edit here, is in the DNS tab.
If you are using Windows XP, the difference is only the interface. But basically what you need to do if you are using Windows XP is go to Control Panel and look for Network Connections. From there you can follow the instruction from #4.
Ok then, next is...
For Mac OS, its a little bit different.
But in the end, you'll still editing the connection preference. I don't have the screenshots, but this is basically what you need to do.
But in the end, you'll still editing the connection preference. I don't have the screenshots, but this is basically what you need to do.
#1. From the Apple menu, click System Preferences, then click Network.
#2. If the lock icon in the lower left-hand corner of the window is locked, click the icon to make changes, and when prompted to authenticate, enter your password.
#3. Select the connection for which you want to configure. For example, to change the settings for an Ethernet connection, select Built-In Ethernet, and click Advanced. But to change the settings for a wireless connection, select Airport, and click Advanced.
#4. Select the DNS tab.
#5. Click + to replace any listed addresses with, or add, the Google IP addresses at the top of the list: 8.8.8.8 and 8.8.4.4.
#6. Click Apply and OK.
Enjoy!
doesnt work?
ReplyDeleteLet me guess, u're using usb based broadband? U need to adjust the dns from your usb modem. Otherwise it would reset back to the ISP dns everytime u connect to the internet.
ReplyDeletei successfully change the DNS and connected to internet, but the websense still blocked the site,, how r??
ReplyDeletehey i found another way to bypass dns malaysia ,megashare, filestube too on the internet
ReplyDelete